- Locate and confirm the leak
Perform a comprehensive leak detection to locate the leak. Confirm the location of the leak by using hydrophones, by pressure testing the pipe, or by using camera technology. (If you do not currently have a camera, the Hand Held Video Pro is available from LeakTronics). ***If a previous company located the leak, confirm their findings. - Purge the pipe
For best results, drain the pool below the line to be repaired, however a standpipe system can also be used to keep from draining the pool. Using a wet/dry vac, blow the water out of the line completely. ***NOTE: It is extremely important that the pipe to be repaired is completely dry before proceeding. If the pipe is not completely dry, the Accumix will not adhere properly. If working on (example) multiple returns tied to one trunkline it is extremely important to blow from all returns to evacuate the entire line. (example) multiple skimmers tied to one trunkline also need to be evacuated of any water or moisture by blowing from both locations. - Sand the pipe
The sanding process cleans, roughens up and primes the interior of the pipe to get it ready for the Accumix. Attach the proper sized sanding disc to the drum cable and sand the pipe, both before and after the leak in the line. ***NOTE: When removing the sanding disc from the pipe, if any water or dirt are noted, do not proceed to step 4, however, continue drying the pipe. The line MUST be completely dried for best results. Once confirming that the interior of the pipe is dried, proceed to step 4. ***NOTE: It may be necessary to blow out the line for a maximum of 45 minutes depending on different applications. - Blow out the debris
When the pipe is completely dry and after sanding the pipe, use a wet vac to blow out any debris from the sanding process. - Get Prepared
Gather protective disposable gloves, protective safety goggles and protective clothing (not included). Also gather all 3 Accumix Parts along with the mixing cup and paddle bit. Be sure to have the proper size brushes, sanding discs and Hand or Floor Auger for the Accumix application. It is also advised to lay down a protective ground cover at the area where working and to also have rags on hand. Build and attach a stand pipe to pour the Pipepoxy Accumix at the pipe to be repaired. - Mixing and Pouring the Accumix
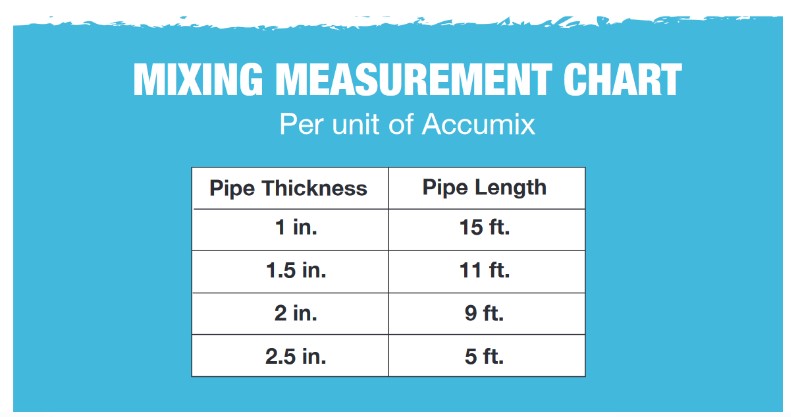
Refer to the coverage guide to determine how much Accumix is needed to adequately cover the area to be coated. Wearing protective items as mentioned in #5, mix the predetermined calculated amount of parts 1, 2 and 3 in the mixing cup and use the paddle bit to mix thoroughly. ***For best results, mix for a minimum of 2 minutes making sure that all parts of the Accumix are blended together smoothly with no lumps. It is recommended to pour a dime or quarter size amount of Accumix on cardboard to help determine drying time. Also, keep the test sample out of direct sunlight. After mixing, pour Accumix in a standpipe to coat the interior of the pipe you are repairing/coating. ***NOTE: Once opened the Accumix must be used and cannot be saved for future use. - Coat the pipe and let dry.
After pouring in the Accumix into your standpipe, use the proper sized brush to push and coat the pipe. The brush should be continuously running both forward and back making a minimum of 3 passes throughout the pipe. It is extremely important not to use too much material for a specific application. This process pushes the Accumix out of the cracks, holes, or separations. ***NOTE: The brush is capable of passing multiple 90’s and fittings. After completing the application process, hook up the dryer and allow it to operate for approximately 4 hours. - Clean Up
Using rags, wipe down excess Accumix from the applicator brush and cable. After removing the bulk of the Accumix, use goof off or paint thinner on a rag to wipe completely off. Put used gloves and rags into a sealable bag and dispose of gloves, rags and empty Accumix bottles responsibly. - Confirm the repair.
Before removing the dryer, touch the Accumix sample. If the sample is still wet to the touch or tacky, let the pipe continue to dry. Once dry, the test sample should not be able to be pierced with your fingernail. To ensure the Pipepoxy system succeeded at repairing the pipe in question, we recommend conducting a pressure test with air only. If the gauge is holding and not losing pressure, Pipepoxy has done its job and the leak has been repaired. ***NOTE: If there is another small leak it is OK to apply the Pipepoxy Accumix a second time without sanding or prepping the pipe. After the 2nd application, confirm the leak has been repaired.
The pool is now ready to be put back into normal operating mode.

